The hardware assessment uses the following software:
- Audacity (installed on the PC)
- MATLAB (installed on the PC)
- Haptics test app (installed on the DUT)
To learn more about system requirements, see Audacity for Windows, Audacity for Mac, and MATLAB.
Set up Audacity
Audacity needs to be set up to take input from the Sound Blaster sound card at a certain data sampling rate. After connecting the Sound Blaster to your computer's USB port, open Audacity and follow these instructions.
Select Line (USB Sound Blaster HD) as the input microphone source by physically connecting the CCLD output to the Line In input port of the Sound Blaster.

Figure 1. Selecting microphone input
Set the sampling rate to 48 kHz by selecting 48000 in the Project Rate menu.

Figure 2. Setting the sampling rate
Download MATLAB
Download the MATLAB file.
Extract the file and find
Effect1NEffect2_V1p0_2020PM.m(for Effect1 and Effect 2) andEffect3_V1p0_2020PM.m(for Effect 3).
Set up the test app on the phone
This section describes how to set up the test app on the phone.
Prepare for the test app
- Copy the source code from the Java and Kotlin code blocks below. Choose whichever works best for you.
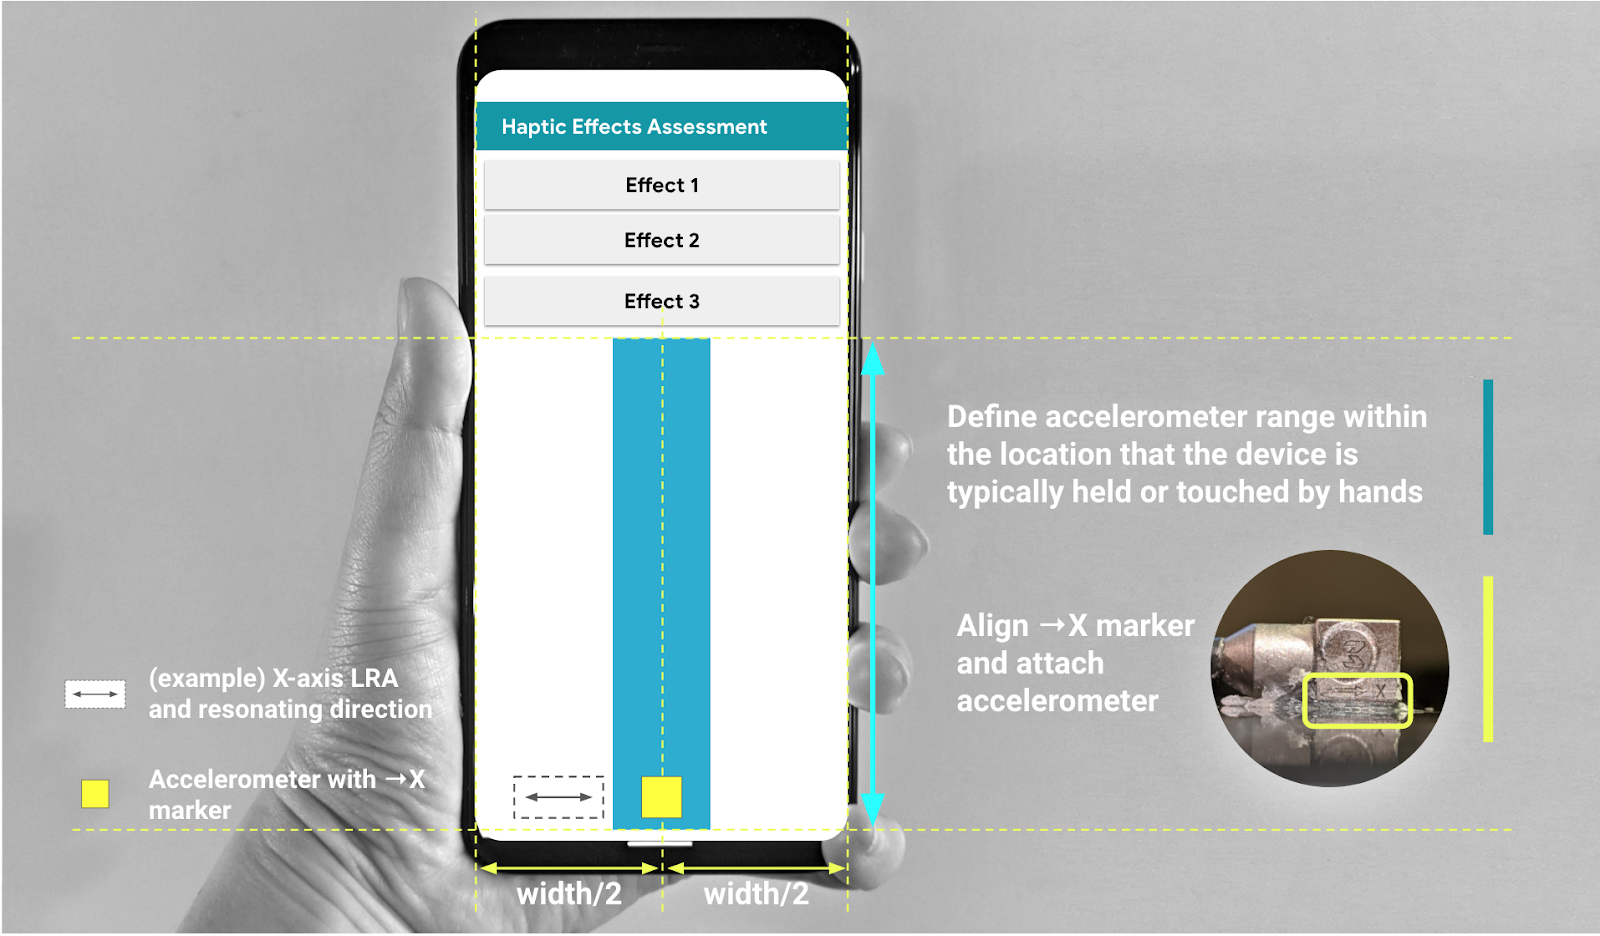
- Write your own code following the GUI parameters illustrated in Figure 3. Adjust the details of the layout source code to match with your phone if necessary.
Make sure that your GUI includes three clickable buttons and a visual indicator to define the area to locate the accelerometer.
- The area to locate the accelerometer represents the real estate of the device's screen that's commonly touched by hand.
- During this measurement, you can move the accelerometer within the turquoise area to find the area of the screen that captures the strongest signal.
Install the code on the Android device.
Setting the system navigation mode to gesture mode is highly recommended if the default mode is set as buttons.
- By setting the gesture mode, you can put the accelerometer at the bottom of the phone as much as possible while not interrupted by the phone's system navigation GUIs.
Java source code
package com.example.hapticeffectassessment;

import static android.os.VibrationEffect.EFFECT_CLICK;

import android.graphics.Color;
import android.os.Bundle;
import android.os.VibrationEffect;
import android.os.Vibrator;
import android.widget.Button;
import androidx.appcompat.app.AppCompatActivity;

public class MainActivity extends AppCompatActivity {

 private static final long oneShotTiming = 20;
 private static final int oneShotAmplitude = 255;

 private static final long[] waveformTimings = {500, 500};
 private static final int[] waveformAmplitudes = {128, 255};

 @Override
 protected void onCreate(Bundle savedInstanceState) {
   super.onCreate(savedInstanceState);
   setContentView(R.layout.activity_main);

   Vibrator vibrator = getSystemService(Vibrator.class);

   // Click R.id.button1 button to generate Effect 1
   findViewById(R.id.button1).setOnClickListener(
       view -> vibrator.vibrate(VibrationEffect.createPredefined(EFFECT_CLICK)));

   // Click R.id.button2 button to generate Effect 2
   findViewById(R.id.button2).setOnClickListener(
       view -> vibrator.vibrate(VibrationEffect.createOneShot(oneShotTiming, oneShotAmplitude)));

   // Click R.id.button3 button to generate Effect 3
   findViewById(R.id.button3).setOnClickListener(view -> {
     vibrator.vibrate(VibrationEffect.createWaveform(waveformTimings, waveformAmplitudes, -1));

     // See quick results of Effect 3
     Button button = (Button) view;
     if (vibrator.hasAmplitudeControl()) {
       button.setText("Effect 3: PASS");
       button.setBackgroundColor(Color.GREEN);
       button.setTextColor(Color.BLACK);
     } else {
       button.setText("Effect 3: FAIL");
       button.setBackgroundColor(Color.RED);
       button.setTextColor(Color.WHITE);
     }
   });
 }
}
Kotlin source code
package com.example.hapticeffectassessment

import android.graphics.Color
import android.os.Bundle
import android.os.VibrationEffect
import android.os.VibrationEffect.EFFECT_CLICK
import android.os.Vibrator
import android.widget.Button
import androidx.appcompat.app.AppCompatActivity
import kotlinx.android.synthetic.main.activity_main.*

class MainActivityKt : AppCompatActivity() {

 private val oneShotTiming: Long = 20
 private val oneShotAmplitude = 255

 private val waveformTimings = longArrayOf(500, 500)
 private val waveformAmplitudes = intArrayOf(128, 255)

 override fun onCreate(savedInstanceState: Bundle?) {
   super.onCreate(savedInstanceState)
   setContentView(R.layout.activity_main)

   val vibrator = getSystemService(Vibrator::class.java)

   // Click button1 to generate Effect 1
   button1.setOnClickListener {
     vibrator.vibrate(VibrationEffect.createPredefined(EFFECT_CLICK))
   }

   // Click button2 to generate Effect 2
   button2.setOnClickListener {
     vibrator.vibrate(VibrationEffect.createOneShot(oneShotTiming, oneShotAmplitude))
   }

   // Click button3 to generate Effect 3
   button3.setOnClickListener {
     vibrator.vibrate(
       VibrationEffect.createWaveform(waveformTimings, waveformAmplitudes, -1))

     // See quick results of Effect 3
     if (vibrator.hasAmplitudeControl()) {
       button3.text = "Effect 3: PASS"
       button3.setBackgroundColor(Color.GREEN)
       button3.setTextColor(Color.BLACK)
     } else {
       button3.text = "Effect 3: FAIL"
       button3.setBackgroundColor(Color.RED)
       button3.setTextColor(Color.WHITE)
     }
   }
 }
}
Layout source code (activity_main.xml)
<?xml version="1.0" encoding="utf-8"?>
<androidx.constraintlayout.widget.ConstraintLayout xmlns:android="http://schemas.android.com/apk/res/android"
   xmlns:app="http://schemas.android.com/apk/res-auto"
   xmlns:tools="http://schemas.android.com/tools"
   android:layout_width="match_parent"
   android:layout_height="match_parent"
   tools:context=".MainActivity">

   <Button
       android:id="@+id/button1"
       android:layout_width="350dp"
       android:layout_height="60dp"
       android:layout_marginStart="32dp"
       android:layout_marginTop="5dp"
       android:layout_marginEnd="32dp"
       android:text="Effect 1"
       android:textSize="18sp"
       app:layout_constraintEnd_toEndOf="parent"
       app:layout_constraintStart_toStartOf="parent"
       app:layout_constraintTop_toTopOf="parent" />

   <Button
       android:id="@+id/button2"
       android:layout_width="350dp"
       android:layout_height="60dp"
       android:layout_marginStart="32dp"
       android:layout_marginTop="5dp"
       android:layout_marginEnd="32dp"
       android:text="Effect 2"
       android:textSize="18sp"
       app:layout_constraintEnd_toEndOf="parent"
       app:layout_constraintStart_toStartOf="parent"
       app:layout_constraintTop_toBottomOf="@+id/button1" />

   <Button
       android:id="@+id/button3"
       android:layout_width="350dp"
       android:layout_height="60dp"
       android:layout_marginStart="32dp"
       android:layout_marginTop="5dp"
       android:layout_marginEnd="32dp"
       android:text="Effect 3"
       android:textSize="18sp"
       app:layout_constraintEnd_toEndOf="parent"
       app:layout_constraintStart_toStartOf="parent"
       app:layout_constraintTop_toBottomOf="@+id/button2" />

   <View
       android:id="@+id/divider"
       android:layout_width="363dp"
       android:layout_height="1dp"
       android:layout_marginStart="32dp"
       android:layout_marginTop="10dp"
       android:layout_marginEnd="32dp"
       android:background="?android:attr/listDivider"
       app:layout_constraintEnd_toEndOf="parent"
       app:layout_constraintHorizontal_bias="0.5"
       app:layout_constraintStart_toStartOf="parent"
       app:layout_constraintTop_toBottomOf="@+id/button3" />

   <androidx.constraintlayout.widget.ConstraintLayout
       android:layout_width="363dp"
       android:layout_height="0dp"
       app:layout_constraintBottom_toBottomOf="parent"
       app:layout_constraintEnd_toEndOf="parent"
       app:layout_constraintHorizontal_bias="0.5"
       app:layout_constraintStart_toStartOf="parent"
       app:layout_constraintTop_toBottomOf="@+id/divider">

       <ImageView
           android:id="@+id/imageView"
           android:layout_width="wrap_content"
           android:layout_height="wrap_content"
           android:adjustViewBounds="true"
           android:scaleType="fitXY"
           app:layout_constraintBottom_toBottomOf="parent"
           app:layout_constraintEnd_toEndOf="parent"
           app:layout_constraintHorizontal_bias="0.5"
           app:layout_constraintStart_toStartOf="parent"
           app:layout_constraintTop_toTopOf="parent"
           app:srcCompat="@drawable/bluebar" />
   </androidx.constraintlayout.widget.ConstraintLayout>

</androidx.constraintlayout.widget.ConstraintLayout>

Figure 3. Attaching the accelerometer along the area recommended in the GUI
